Have you ever stared at an empty room and felt overwhelmed by the possibilities? Most of us can picture our dream space in our minds, but turning that vision into reality is where things get tricky.
That’s why over 18 million people have turned to Homestyler, a powerful home design tool that makes planning, decorating, and visualizing your space fun. Whether you’re designing your first apartment or staging a home to sell, Homestyler offers drag-and-drop simplicity with professional features, realistic renders, and access to over 300,000 pieces of branded furniture.
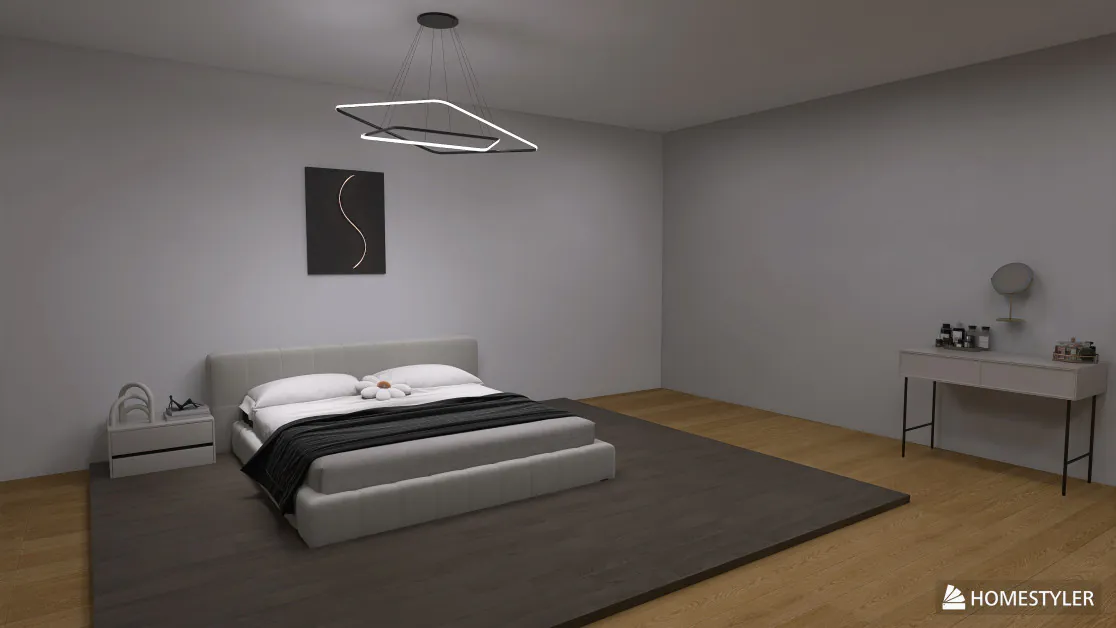
In this Homestyler review, I’ll discuss the pros and cons, what it is, who it’s best for, and its key features. Then, I’ll show you how I used Homestyler to create this customized 4K render of a bedroom in minutes:

Pretty impressive, right? I was shocked at how real it looked.
I’ll finish the article by comparing Homestyler with my top three alternatives (REimagine Home, Planner 5D, and Foyr Neo).
If you’ve ever wished your Pinterest board could come to life, Homestyler might be your new favorite tool! Let’s see what it’s capable of.
Verdict
Homestyler offers an easy drag-and-drop design experience with flexible customization, a huge furniture library, AI tools, and cloud rendering that works on any device. However, it performs best on Google Chrome, can lag with large projects, requires paid plans for many items, and lacks a desktop app for offline use.
Pros and Cons
- Easy drag-and-drop design
- Flexible customization for colors, materials, and layouts
- Large furniture and decor library with 300,000+ items
- AI tools for quick room decoration and layout suggestions
- Cloud rendering for realistic 3D views and videos
- Works on any device with Internet access
- Built-in features for team collaboration and sharing
- Free plan includes access to core tools and standard renders
- Community support and inspiration from shared user projects
- It only works well on Google Chrome (limited or no support on Firefox and Safari)
- Can lag or slow down with larger projects or while moving items
- Many furniture and decor pieces require a paid plan
- There’s no desktop app available for working offline (web-only access)
What is Homestyler?
Homestyler Floor Planner
Homestyler is a user-friendly 2D and 3D home design platform that allows you to create detailed floor plans, visualize interior layouts, and generate photorealistic renderings of home and room designs before making a purchase. It’s like a virtual playground for your home design ideas, except much more sophisticated than basic room planners.
Homestyler caters to a wide range of users, including homeowners, DIY enthusiasts, professional interior designers, real estate professionals, and educators. It’s widely used for interior design visualization, space planning, and real estate presentations. This makes Homestyler a versatile tool for both professionals and individuals looking to bring their design ideas to life.
Brief History & Evolution of Homestyler
Homestyler originated from a project called “Dragonfly,” a prototype developed by Autodesk in 2009. It officially launched as a free web-based design tool in 2010.
What makes Homestyler different from other design software is its massive catalog of real furniture from actual brands like IKEA and Wayfair. So when you’re designing your space, you’re not just placing generic “couch-shaped objects” on your floor plan. You’re working with the exact sofa you’re thinking about buying.
Key Differentiators

What sets Homestyler apart is the rendering quality. The 3D visualizations don’t look like blocky, cartoon-style renderings you get from some other tools. They actually look photorealistic.
I was genuinely impressed with how realistic my render looked when I exported it. You’ll get a range of render qualities you can choose from, including 1K, 2K, and 4K.
Target Audience
The platform targets three main groups of people:
- Regular homeowners who want to experiment with layouts
- Professional interior designers who need to show clients visual mockups
- Real estate professionals who want to stage properties virtually
For example, realtors can use it to help potential buyers visualize how empty spaces could look furnished.
User Base & Market Position (18+ million users)
The numbers are pretty impressive, too. As of early 2025, Homestyler reports having over 18 million users worldwide. That tells you something about how accessible and useful people find it! That user base includes everyone from DIYers to professional architects using it for quick concept presentations.
Having all these users means there’s a pretty active community sharing designs and tips. Sometimes I’ll browse through other people’s room designs just for inspiration, which has saved me from some questionable decorating decisions.
Homestyler works entirely in your web browser, so there’s no software to download or install. You just create an account and start designing!
Who is Homestyler Best For?
Here are the types of people who would benefit the most from using Homestyler:
- Interior Designers can use Homestyler to create high-quality 3D visualizations, streamline client presentations, and ultimately speed up their design process.
- Real Estate Professionals can use Homestyler to showcase properties with virtual staging and floor plans, making their marketing and sales more effective.
- Homeowners & DIY Enthusiasts can use Homestyler to experiment with different layouts and styles with a user-friendly interface and a large furniture library.
- Students & Educators can use Homestyler for learning and design projects with easy access to professional tools. Homestyler even offers special educational discounts (35% off for students and teachers, and up to 50% off for universities and educational organizations) to make it more accessible for academic use.
- Furniture Brands & Retailers can use Homestyler to build 3D showrooms to help customers see how products look in real spaces.
- Design Agencies & Teams can use Homestyler to collaborate through shared design spaces and libraries for joint projects or client work.
- Commercial Developers can use Homestyler to create custom designs for business spaces.
Homestyler Key Features
Here are Homestyler’s key features:
- AI-Powered 3D Design Suite: Homestyler uses NVIDIA to power its AI tools to turn sketches into realistic 3D renders and suggest furniture layouts that fit your room.
- Voice-to-Design: Create designs with voice commands (e.g., “Create a modern living room with beige tones”).
- Mobile AR Preview: Preview your designs in real spaces using augmented reality (AR) on smartphones.
- Furniture & Decor Library: Access 300,000+ 3D furniture models and decor items, including actual brand products. The AI Decor feature automatically furnishes rooms based on the style you’ve selected to save time on manual placement.
- 2D/3D Flexibility: Easily build your floor plan in 2D and instantly switch to 3D views for a realistic perspective.
- 3D Floor Planning & Rendering: Combines floor planning, 3D modeling, and rendering in one platform. Offers cloud rendering with unlimited 1K renders for free and optional 4K renders for purchase.
- Collaboration & Teamwork: Supports editing by multiple people (with version control), making it easy for designers, architects, and clients to collaborate from anywhere.
- Integration & File Conversion: AutoCAD and SketchUp integration through OpenUSD to speed up file conversion and workflow for professionals.
- Customization & Advanced Modeling: Custom furniture tools, 3D features like fillet and revolve, and support for custom models make designing more flexible.
- Advanced Rendering Features: Access advanced rendering features such as spotlights, depth of field effects, batch watermark removal (for members), and opening animations for panoramas.
- User-Friendly Interface: Drag-and-drop design tools are easy to use for both beginners and professionals, with AI assistance to speed up design and furnishing.
- Affordable & Flexible Pricing: Free basic plan with many features, plus paid options for higher-quality renders and premium content.
How to Use Homestyler
Here’s how I used Homestyler to create a customized 4K render of a bedroom:
- Create a Homestyler Account
- Create a Floor Plan
- Choose a Unit of Measurement
- Choose a Project Default View
- Draw Your Room Walls
- Decorate Your Room
- Get AI to Decorate Your Room
- View Your Room in 3D
- Render Your Image
Step 1: Create a Homestyler Account

I started by going to homestyler.com and selecting “Start Designing” from the top right.
Step 2: Create a Floor Plan

After creating an account, I was given two options:
- Create a floor plan by importing an image, importing a CAD, creating a new design, or accessing my existing designs.
- Quickly start with a project or room template.
For the sake of this tutorial, I chose “New Design” to demonstrate how to create a fresh layout from scratch in case you need specific dimensions. But if you’re in a pinch, feel free to choose one of Homestyler’s 500+ templates.
Step 3: Choose a Unit of Measurement

Next, Homestyler asked me what unit of measurement I wanted to use to create my floor plan:
- Meters
- Feet
- Centimeters
- Millimeters
I kept it in meters, but feel free to choose the unit of measurement that makes the most sense for you. I hit “Next” to continue.
Step 4: Choose a Project Default View

Next, Homestyler asked me which default view I wanted:
- 3D View
- Room View
I chose “3D View” for a wider angle and hit “Next.”

From there, Homestyler asked me about my mouse settings, which I kept on default.
Once everything was in place, I was taken to the Homestyler designer! This was where I could create and design floor plans, decorate rooms, and visualize spaces in 3D.
Step 5: Draw Your Room Walls

To start creating a room, I went to “Build” on the top right. This was where I could draw my walls by clicking and dragging my mouse in the space. Alternatively, I could upload rooms in 2D, and Homestyler would automatically convert them into 3D!
I was given three options for how I could draw my walls:
- Draw straight walls
- Draw rooms
- Outside area

I tried drawing straight walls and entire rooms. Both methods gave me specific measurements of my walls by clicking and dragging with my mouse.
- “Draw straight walls” allowed me to draw each wall individually, with measurements shown as I dragged the cursor. This method is best for full control and accuracy when laying out a space.
- “Draw rooms” allowed me to draw square, L-shaped, or T-shaped rooms with a single click. This method is best for quickly laying out spaces and maintaining clean, consistent shapes.
Step 6: Decorate Your Room

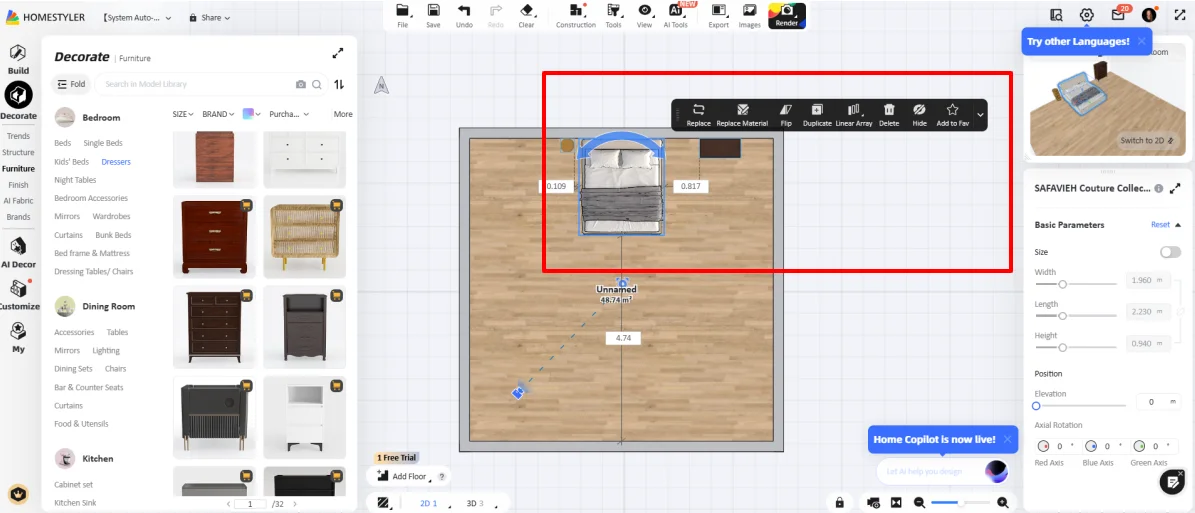
Once my room was created, it was time to decorate! I went to “Decorate,” which was below “Build.” Homestyler comes with over 10 million branded pieces of furniture models to decorate with, so there’s no shortage of options!
Everything was organized into the following categories:
- Trends (browse furniture and decor based on trends)
- Structure (Stairs, Environment, Windows, Wainscot, Doors, Railing, etc.)
- Furniture (Living Room, Bedroom, Dining Room, etc.)
- Finish (Floor, Tiles, Marble, etc.)
- AI Fabric (Throw, Bedding, Curtain, etc.)
- Brands (browse furniture based on the brand)
These categories made it easy for me to find exactly what I was looking for. The search tool also made it easy to find what I needed.

I found it easy to drag and drop furniture pieces into the room and orient them exactly how I wanted.
Selecting the piece of furniture gave me the following options:
- Rotate
- Replace
- Replace material
- Flip
- Duplicate
- Linear array
- Arc array
- Delete
- Hide
- Add to Favorites
Ultimately, I felt in control of the design process and appreciated how intuitive the tools were. The range of options made it easy to experiment and fine-tune the layout to match my vision.
Step 7: Get AI to Decorate Your Room

If I didn’t feel like designing and decorating from scratch, I could get AI to automatically decorate single rooms or entire homes for me! I could filter these based on area, type, and style.

In my case, I wanted to design a bedroom. I hovered my mouse over “White Minimalist Style Bedroom” and hit “Quick Apply.”

From there, I selected my entire floor plan and hit “Continue” to apply the design.

A few seconds later, my entire room had automatically transformed into the bedroom template I had chosen!
Step 8: View Your Room in 3D

To get an even better view of what I had created, I could switch from 2D to 3D on the bottom left. The 3D view helped me spot areas that felt too cramped and adjust the furniture placement. You can move the camera exactly where you want by panning, zooming, and adjusting the angle with your mouse.
Step 9: Render Your Image

Once I was happy with everything, it was time to visualize my design by creating a render.
Hovering over the “Render” button on the top right, I was presented with the following options:
- Normal image
- Panorama
- Aerial View
- Top View
- Video
- Video 2.0
I selected “Normal Image.”

Within the preview, I could click and drag to adjust the camera angle.
On the left, I could choose the resolution (1K, 2K, or 4K), choose my aspect ratio, and adjust the lighting according to different seasons and times of day. On the right were more camera settings I could adjust.
To export my design, I hit “Render” at the bottom.
A few minutes later, my design was exported! Here’s how it came out in 4K resolution:

It came out looking more realistic than I expected!
Overall, Homestyler made the design process feel simple and enjoyable. I was impressed by how realistic the final 4K render looked and how easy it was to bring my vision to life, especially with the AI templates.


